
AudioReputation is reader-supported. When you buy through links on our site, we may earn an affiliate commission Learn More
Finding the right speaker wire for your speaker system seems easy. You just have to find the wire that’s thick enough to fit the speaker terminals, right? Well, not exactly. There’s a little bit more to speaker wire than you may think. But don’t worry – it’s not too complicated. We are here today to tell you everything you need to know about speaker wire. We will discuss the gauges, wire materials, important electrical characteristics, installation process, and tell you about some tricks and marketing gimmicks the manufacturers use to sell their wire. Let’s go!
Table of Contents
- What is Speaker Wire?
- Resistance – The Most Important Electrical Characteristic of a Speaker Wire
- Wire Gauge Explained
- Commonly Used Conductor Materials
- Speaker Wire Terminations
- How to Choose Speaker Wire?
- How to Install Banana Plugs?
- Bi-wiring and Bi-amping
- How to Hide Speaker Wire?
- Myths About Speaker Wire
- Conclusion
- FAQs
What is Speaker Wire?
Speaker wire is a cable used to connect amplifiers to speakers. This cable sends amplified audio to the speakers. It has a core, which is usually made of copper and can be either stranded or solid and a PVC jacket protecting the core from interference and other external influences.
In most cases, the core is stranded, which means it consists of a bunch of smaller wires wrapped together forming a larger (thicker) conductor. There a few reasons for that. First of all, when the conductor is solid, the cable is much less flexible, which makes the installation more difficult. More importantly, solid conductors exhibit more skin effect (we will be talking about skin effect in a few minutes), which raises the resistance and increases power losses, and that’s something we want to avoid.

10 AWG stranded speaker wire
Speaker wire has a few important electrical characteristics that you should be paying attention to when looking for a speaker wire, and when planning the installation. The key characteristics are resistance, inductance, and capacitance. Every audio specialist will tell you that resistance is, by far, the more important characteristic of a speaker wire. Understanding it is very important for choosing the right kind and right gauge of speaker wire. So, let’s find out more about speaker wire resistance.
Resistance – The Most Important Electrical Characteristic of a Speaker Wire
The resistance, as the name implies, is a measure of the electrical resistance of a cable to a current flow. In layman’s terms, resistance is the factor that causes power losses (aka insertion losses). The higher the resistance, the higher the power losses. And we definitely don’t want that. We want most of the power that gets sent from the amplifier to reach the destination (our speakers). This means that we want low-resistance cables.
Besides the power losses, the cable resistance also has an effect on the damping factor. The damping factor represents the ratio of the speaker’s impedance to the source impedance (in our case, cable resistance). What we want is a high damping factor (preferably higher than 50). This means, again, that we want low-resistance speaker cables. When the resistance is higher, the damping factor is lower, and when the damping factor is really low, there’ll be some audible negative effects on the sound similar to effects caused by the power loss (the bass may sound boomy and the whole audio reproduction will become less linear).
So, now you know why we need low-resistance speaker wire. But what determines the resistance of a speaker wire, and what kind of resistance is acceptable?
Resistance is determined by the thickness (gauge) and length of a speaker cable – it is a ratio of speaker wire length to thickness (cross-section area).
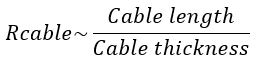
So, the longer the wire, the higher the resistance. Also, the thicker the wire, the lower the resistance. To get the lowest possible resistance, you will have to use the thickest and shortest possible speaker wire. And naturally, if there’s a need for long cable runs, you have to use the thickest possible wire.
Now that you know what kind of wire you need to get low resistance, let’s see what’s considered acceptable or low resistance? It is generally accepted that if the resistance is lower than 5% of the entire circuit (basically 5% of the speaker’s impedance), it can be considered low. Naturally, you should be looking for the lowest possible resistance.
Another important factor that has some effect on resistance and is worth mentioning is the skin effect. Skin effect is a phenomenon known since 1915. It is a tendency of AC current to flow near the conductor’s surface and not use the entire surface of the conductor. Because the current uses just a small portion of the surface (and not the whole surface), the resistance increases. The good news is that the increase in resistance and the overall increase in power loss caused by the skin effect is practically negligible, especially when it comes to audible frequencies (20Hz-20kHz).
So, why did we mention the skin effect? Why did we say it was worth mentioning? Well, just because we wanted to warn you about the manufacturers who use the skin effect as a selling point. You may come across some very expensive speaker cables that are supposed to eliminate or reduce the power losses caused by the skin effect. The manufacturers use these claims to justify the price of their cables when in reality, the skin effect doesn’t really need fixing. Not because it doesn’t exist, but because it doesn’t cause any significant losses in the frequency range that is important for the sound.
Wire Gauge Explained
Wire gauge or the American Wire Gauge (AWG) is a standard for measuring the speaker wire thickness. To be more specific, it tells you the thickness of the conductor. Each AWG corresponds to a certain conductor diameter and a certain surface area. The general rule is – lower gauge means thicker wire. So, an 18 AWG wire is much thinner than a 10 AWG wire. Below, you can see the diameter and surface values for the most common speaker wire gauges.
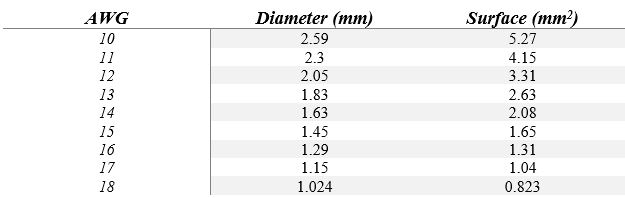
Now that you know about the wire gauge, let’s move onto the more important question – what wire gauge should you use? The shortest and simplest answer would be to use the lowest possible gauge (the thickest possible wire), even for the short cable runs.

Lower gauge (AWG) means thicker wire
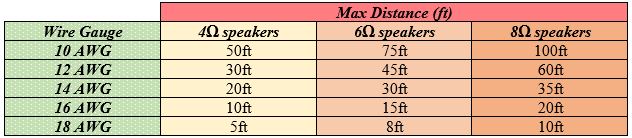
If you want a more elaborate answer and need to know what is considered acceptable (or max allowed) wire length for different speaker loads and different wire AWGs, look at the table below.

Recommended max cable lengths for different speaker wire gauges
One thing you know from the previous section (the one about cable resistance), is that increasing the cable length increases the resistance. Also, you know that increasing the cable thickness reduces the resistance. So, thicker cables can be used for longer distances. Finally, you know that if the cable resistance is a constant value, the power losses will be higher if the speaker impedance is lower. This means that you can use longer cables with 8Ω speakers than with 4Ω speakers to reach the same power losses. So, the longest cable runs are possible when using higher-impedance speakers and the lowest possible wire gauge.
If you are looking for audiophile performance, you may want to be more conservative when it comes to max allowed lengths. The table below provides you with the recommended max wire lengths for audiophile setups.
Conservative max length values for audiophile setups
If you don’t want to deal with numbers and max lengths, the easiest rule to follow is the one we already gave you – use the lowest possible wire gauge regardless of the wire length or speaker impedance. Also, use the same wire gauge for all the speakers in your home theater setup.
Check out our article on: How to Connect Speaker Wire to TV?
Commonly Used Conductor Materials
The most commonly used materials are copper and copper-clad aluminum. Some manufacturers use the so-called oxygen-free copper (OFC), which is basically just a regular copper conductor with good insulation. Copper proved to be a great conductor. It provides fairly low resistance, low power losses, and it’s not too expensive, which makes it the best choice, even for audiophile setups. The only problem with copper is that it rusts when exposed to air. When that happens, it loses its conductive properties, and the resistance increases. That’s why it’s important that the conductor is well insulated.
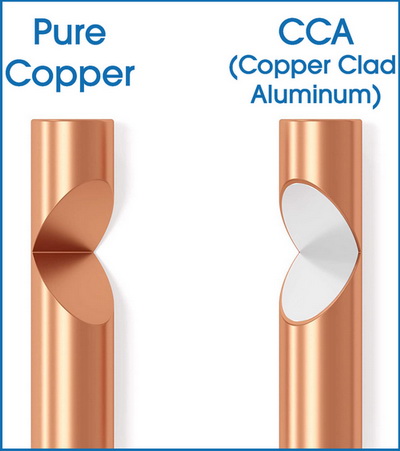
Many manufacturers use CCA because it’s cheaper than pure copper
High-end exotic cables may use silver instead of copper. Silver does have slightly better conductive properties (it has a lower resistance), which means that you can use lower gauge wire for longer runs than with copper conductors. However, speaker cables with silver conductors are significantly pricier than copper cables (even those with lower gauges). Also, even though they definitely bring some measurable performance improvements, you may not be able to hear those improvements (the improvements are measurable but may not be audible).
So, if you ask us, the best advice we can give you is to stick to good-old speaker wire with a copper conductor.
Speaker Wire Terminations
Depending on the type of speaker terminals on your amplifier and your speakers, you will have to use a different kind of termination to connect a speaker wire to your amp and speakers.
Cheaper units usually have spring-loaded terminals. For those terminals, you will use either bare wires or flex pin plugs. You will also have to pay attention to the size of the clips. Depending on their size, you may have to use a thinner wire (higher AWG).
The most common type of speaker terminals are 5-way binding posts. They are the most versatile kind of connection and allow you to use bare wire, spade lugs, flex pin plugs, or banana plugs. Of all the mentioned terminations, banana plugs are, by far, the most popular.

Most common speaker wire terminations
Speaker terminations are often gold-plated. Gold is not used for the speaker wire because it has a higher resistance than copper and silver but it’s used for terminations (in the form of plating) because it doesn’t oxidize in contact with air.
How to Choose Speaker Wire?
This topic is almost entirely covered by the previous few chapters so let’s just make a short summary.
- Measure the distance between the amp and speakers, and calculate how much wire you need. The wire should be a bit loose – it’s not good if the wire is hanging in the air (if it’s too tight), especially if you are running the wires across the room.
- Choose the right gauge – go for the thickest wire gauge that fits the terminals on your amp and speakers.
- Choose the right material – copper (pure copper, CCA, or OFC) is the safest and most affordable choice. You can also buy more expensive silver cables or some other exotic cable, but there’s a great chance that you won’t hear any difference. So, unless you’re building a high-end system, it’s probably smarter to stick to copper (preferably pure copper).
- Choose the right terminations. Depending on the equipment you have, you should choose the matching terminations. In most cases, banana plugs are the best option. If your equipment has spring-loaded terminals, you will have to use bare wires or flex pin plugs.
- Additional considerations – Depending on your needs and setup, you may also have to buy the tools for wiring. If you want to run the wire behind the drywall, you should use a CL-2 wire (wire with a fire-resistant jacket). If you don’t want to run the wires behind walls but want it to be virtually invisible, you may want to check out those special types of flat speaker wire (aka ghost wire).
How to Install Banana Plugs?
Installing banana plugs is a fairly easy and quick job. It shouldn’t take more than a minute or two per connector. You have to strip the wire first. The easiest way to do that is with a wire stripper. If you don’t have it, you can do that with a scalpel, knife, or even scissors. Then, unscrew the banana plug, push the wire inside, and screw the tip of the banana plug back on. After you install all the banana plugs, connect the speaker wire to your amp and to the speakers, and you’re ready to go. It’s that easy.

Step-by-step instructions – How to install banana plugs and connect them to speakers
Bi-wiring and Bi-amping
Some speakers, usually those large floorstanding speakers, have twin binding posts (two sets of binding posts) connected with gold-plated straps. Do you know what these twin posts are used for? And do you even have to use both sets of binding posts?
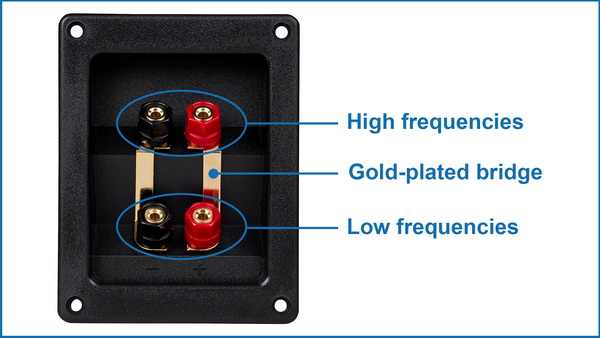
Twin binding posts connected with a gold-plated bridge
First things first – you don’t have to use both sets. If your amp is powerful enough to drive those floorstanding speakers, you don’t have to remove that gold-plated strap – just use one set of terminals and connect the banana plugs.
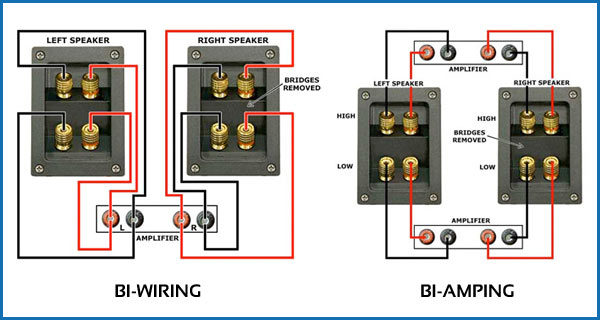
If you like experimenting with your equipment or have a feeling that your speakers need more power to shine, you can try bi-wiring or bi-amping. So, let’s find out what are bi-wiring and bi-amping, and learn something about the benefits of bi-wiring/bi-amping.
In both cases, you have to remove those gold-plated straps connecting two sets of binding posts on the back of your speakers. Also, you have to double the wiring. If you used two sets of cables for the regular setup, you now need 4 sets for bi-wiring/bi-amping.
To bi-wire the speakers, you will be using the same amp you already have and the same speaker terminals on that amp you were using before. However, instead of running one set of cables to one speaker, you will be using two sets of cables. You have to connect two speaker wires to the red terminal on your amp and two speaker wires to the black terminal. Connect wires coming from the amp’s red terminal to both red terminals on the back of the speaker. Do the same with the wires coming from the amp’s black terminal.
Now, you know how to bi-wire your speakers. But what’s the benefit of bi-wiring? Can you get a higher or cleaner power supply? Can you get a better overall performance? There are many claims about bi-wiring. Some say that it reduces distortion because highs go through one cable and lows through the other.
To be honest, most of the claims about bi-wiring are not true. Bi-wiring only changes the impedance slightly. Some changes can be measured but, in 99.9% of the cases, there’ll be no audible improvements. People may claim that they can hear the difference, but it’s usually just a placebo. So, in our opinion, the benefits of bi-wiring are minimal (or rather nonexistent). Bi-wiring isn’t going to give you anything. That’s why some people call it buy-wiring. If you don’t believe us, test it yourself. After all, it won’t cost you that much – you just need to buy another set of cables and banana plugs.
Bi-amping is a bit more complex than bi-wiring and has a more serious effect on the performance. To bi-amp your speakers, you will need two amps (two separate speaker terminals per one speaker) – one for the lows and the other for the highs. Ideally, you will be using two same amps. Using two different amps will require gain matching.
To bi-amp your stereo speakers, you will run two sets of cables from two speaker terminals on the first amp to low-frequency binding posts on your speakers. Then, run the other two cables from two speaker terminals on the other amp to high-frequency posts on your speakers.
This kind of bi-amping is known as passive bi-amping. The term passive implies that you’re still using passive crossovers inside your speakers. Active bi-amping is a much more complicated procedure than passive and requires removing the crossovers from your speakers and using an external active crossover. We won’t be talking about active bi-amping in this article.
Some benefits of bi-amping are much more obvious than the benefits of bi-wiring. First of all, you’re doubling the power sent to your speakers. This is especially useful if you have a pair of large floorstanders that require a lot of power. However, you may ask yourself what’s an easier and more affordable solution – using two stereo amps to drive one speaker set, using one very powerful stereo amp, or maybe using two monoblocks.
Another benefit of bi-amping is the result of splitting high and low-frequency networks. Because each amp is now responsible for a smaller frequency range, the output is increased and less power gets wasted. Also, by reducing the amp load, you are reducing the chance of tweeter burnout.
How to Hide Speaker Wire?
Wiring your speaker system, especially if you’re trying to make a perfectly clean home theater setup, can be a huge hassle. You can hide the wire in many different ways.
The best option is to run the speaker wire behind the walls or across the attic. Unfortunately, this is also the hardest way. It requires time and planning, and it can be really frustrating. For a detailed explanation of how to run the wires through walls, check out one of our previous articles.
Instead of running the wires through walls, you can use various camouflage technics. Some of the common solutions are cable raceways, ghost speaker wire, and hollow baseboard moldings. Or, you can just hide it under the carpet.
Also Read: How Many Watts Can A 16 Gauge Speaker Wire Handle?
Myths About Speaker Wire
Manufacturers use all kinds of myths and gimmicks to sell their exotic speaker wire or justify very high prices of their wire.
One of the most common stories manufacturers exploit is the story about the skin effect. Some of them may even claim that their speaker wires are skin-effect-free. As explained in one of the previous chapters, skin effect is a term used to describe the tendency of AC current to flow near the conductor’s surface and not use the entire surface of the conductor. The tendency becomes more noticeable with high frequencies. This is a real problem – it increases the wire resistance and, consequently, it increases the power losses. However, this problem is much more relevant for high RF frequencies. When it comes to frequencies that we can hear (20Hz – 20 kHz), the skin effect doesn’t cause any audible deteriorations.
Another myth we’ve heard before is that the speaker wires should be of the same length. Supposedly, that’s how you eliminate the phase shift. It may sound like it makes sense, but it really doesn’t. The electrical signals travel at extremely high speeds through speaker wires (close to the speed of light), so it’s practically impossible to hear any delay if one wire is a few feet shorter or longer than the other.
Some people may also claim that the speaker wire needs a break-in. That is not true. Speaker wire doesn’t need a break-in period.
Conclusion
We have finally reached the end. Hopefully, now you have a much better understanding of speaker wire and know what to look for when buying it. For additional info, read the FAQs section. If you have a question about speaker wire or if you need any advice, leave us a comment below and we will answer promptly.
FAQs
Is thicker speaker wire better?
We recommend using thicker wire whenever possible, especially for long runs. Always use the thickest wire that can fit your equipment. One thing you should be aware of is that using a 12 AWG wire instead of a 16 AWG wire doesn’t really bring any significant or audible improvements over relatively short distances. So, if you already have a 16 AWG wire, you don’t have to buy a thicker wire. The improvements you get over short distances are measurable, but they are not audible.
Are high-end speaker cables worth it?
Most people can’t hear any difference between a moderately priced 12 or 10-gauge speaker cable with a pure copper conductor and a very expensive high-end speaker cable. So, unless you are an audiophile looking for the best possible equipment on the market, you don’t have to buy high-end speaker cables.
Which wire is best for speakers?
Technically speaking, high-end cables with silver conductors will have lower resistance and will cause lower power losses. The real question is – can you hear the difference between a moderately priced pure copper speaker cable and a high-end audiophile speaker cable. Most people won’t hear the difference. So, the best thing you can do is buy a lower-gauge speaker wire (ideally 10 or 12 AWG) with a pure copper conductor, and you will be just fine.
What happens if you wire a speaker backward?
Don’t worry. You won’t damage your speakers. If you wire your speaker backward, you will only reverse the polarity of the speaker. In other words – the speaker will push when it’s supposed to pull and vice versa. If you reverse the polarity on both speakers, you may not even hear the difference in sound quality. If you reverse the polarity on one speaker only, there will be an audible difference, and your system will sound odd.

Hello, my name is James Longman.
I’m a writer and editor at AudioReputation. I disassembled my first portable AM/FM radio when I was only 8. At the age of 11, I burned the circuit board on my old boombox cassette player. I’m not going to explain how but it was reckless and stupid.
Since then, I have become much more careful around radios, boomboxes, and other audio devices (at least, I like to think so) but I have never lost the passion for audio equipment. Throughout 20 years of my professional career, I’ve been working for various audio equipment manufacturers and even started building speakers on my own in my little workshop.
I love the work we do here at AudioReputation. Testing, comparing, and evaluating all kinds of audio devices (speakers, soundbars, headphones, home theater systems, etc.) is something I truly enjoy. I try to be unbiased and give you my honest opinion on every piece of equipment I test. Still, you should take my reviews with a pinch of salt and always be just a little bit skeptical. The fact that I liked some speaker or soundbar doesn’t mean that you are going to love it. If you have the opportunity, you should test it/hear it before buying it.